The Setup
Building this blog has been quite fun. I knew when I built my new blog, I didn’t want to use wordpress or any other blog CMS. I wanted it to be in markdown and in code. This isn’t a pedantic point; it allows me to execute real code in blog posts, building really immersive content and supporting the weird and wonderful ideas I have.
Quarto
I choose Quarto to achieve this. I have used RMarkdown (Quarto’s predecessor) quite a bit and planned to use it to write a book someday. If you’re unfamiliar.
Quarto® is an open-source scientific and technical publishing system built on Pandoc
It effectively is an extension of Markdown with the ability to embed code, similar to say IPython/Juypter Notebook tools but less of a Kernel and more of a publishing tool. It supports pretty much any language or markdown tool but I’m primarily using the RStudio Visual Editor Experience while writing this blog.
One of the main benefits of using Quarto is that it allows you to create fully reproducible documents. This means that someone else can take your document and re-run the code to get the same results, ensuring the transparency and integrity of your work.
So with this choice selected, I knew I needed to host the static output somewhere. The Quarto page has some good guides on using popular frameworks like Netify or Github Pages but I wanted to use Azure.
Azure Static Web Apps
Azure Static Web Apps is a fully managed service that makes it easy to deploy and host static web applications. It offers several benefits, including easy deployment using continuous integration and deployment pipelines, global availability, advanced security features, scalability, and low cost. These features make it a valuable tool for anyone looking to build and host a blog or other static web application.
With Azure accounts you get a free Static Web App with 100GBs of free bandwidth! So with this in mind, I figured that I could deploy and run a relatively free website.
Github
In addition to the benefits of using Azure Static Web Apps, using GitHub as a source control system for your blog posts has several advantages.
Version control: With GitHub, you can easily track changes to your blog posts and revert back to previous versions if needed. This is especially useful if you accidentally delete or modify a post, or if you want to see how a post has evolved over time.
Collaboration: GitHub makes it easy for multiple people to work on the same blog. You can invite other contributors to your repository, and GitHub will track their changes and allow you to review and merge them into your main branch.
Backup: Using GitHub as a source control system means that your blog posts are automatically backed up in a remote repository. This provides an additional layer of protection in case something goes wrong with your local copy of the blog.
Community: By hosting your blog on GitHub, you can benefit from the larger developer community. Other users can fork your repository, suggest changes, or even contribute to your blog directly.
Azure Setup
First, you will need to create an Static Web app, to do this, you should go to the Azure Portal.
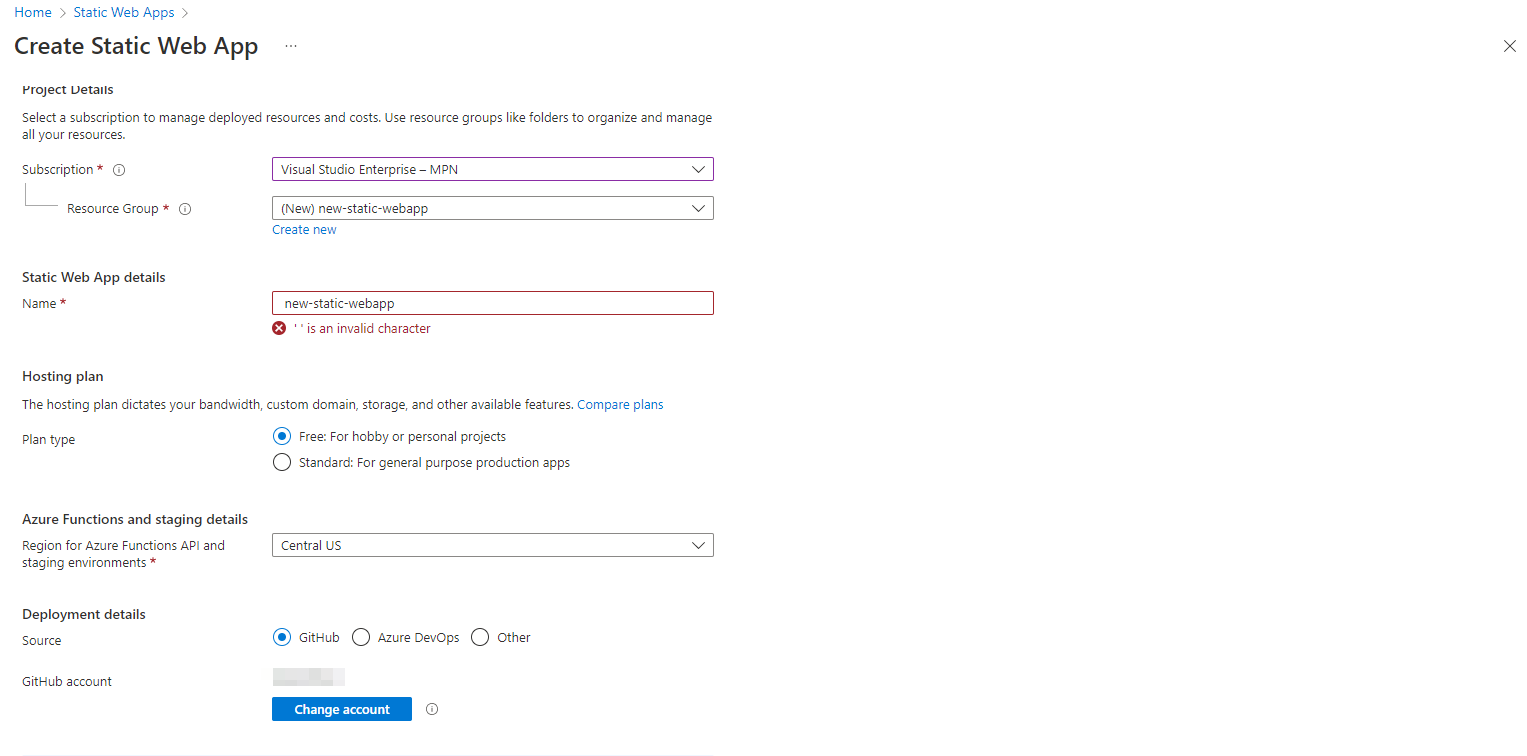
During this, you can select a deployment method; we will select Github. We can then select our repository and branch as per. 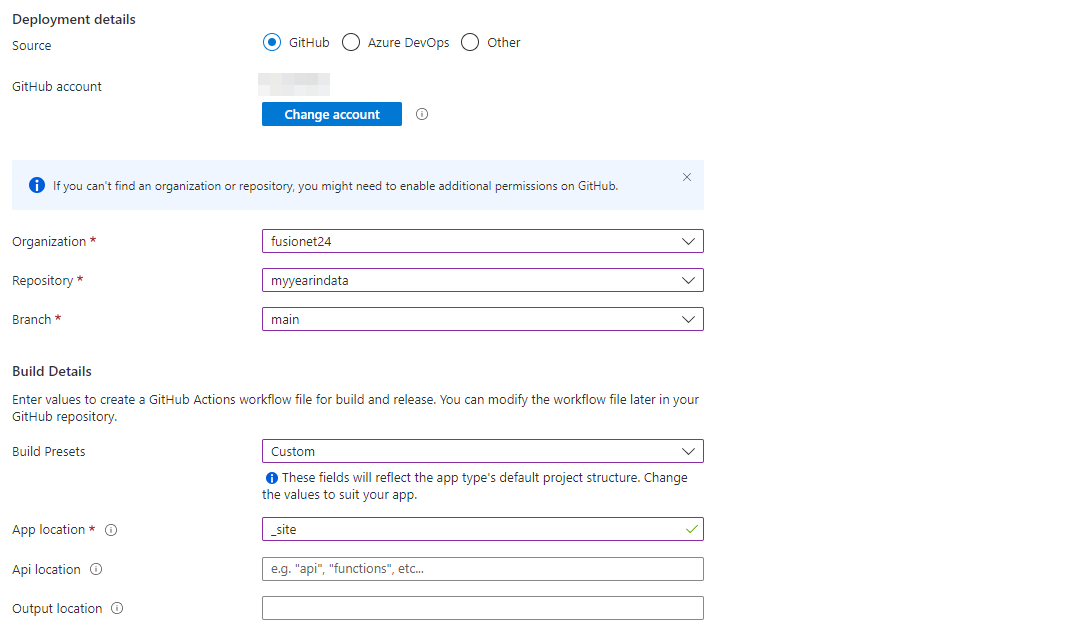
What you will notice is I have entered the _site folder as our app location. This for now, would allow you to check in a locally rendered version of the site in said folder and deploy it using the Github Workflow that will be set up for you from this wizard. Note the next section adds said folder to the .gitignore, thus rendering this deployment method useless and Part 2 & 3 of this series covers How todo this properly with CI/CD.
Once setup, you may wish to setup a custom domain see here to achieve this
Github Setup
For Github, you can set up a pretty basic structure. If you wish to deploy automatically via CI/CD using Github Workflows, you must read Part 2 & 3 of this blog post series.
This is how my repo is structured; everything is held at the root level.
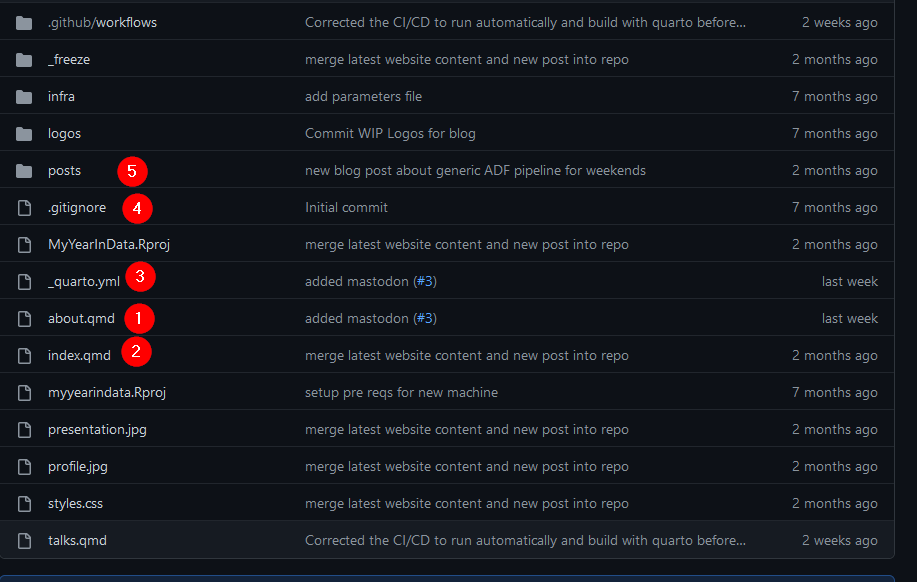
- Is a random page (note the .qmd extenstion) in this instance my about page
- Is my homepage nothing really custom going on here (you can do quite a lot though, read the docs!)
- Is the main driver of the blog, it has all the metadata and configurations. Read this; it gives you a lot of detail
- Essential to any project is the gitignore, we want to ignore local renders of the _site folder when checking in and any other local files. As of writing this is mine for quarto projects
# History files
.Rhistory
.Rapp.history
# Session Data files
.RData
# User-specific files
.Ruserdata
# Example code in package build process
*-Ex.R
# Output files from R CMD build
/*.tar.gz
# Output files from R CMD check
/*.Rcheck/
# RStudio files
.Rproj.user/
# produced vignettes
vignettes/*.html
vignettes/*.pdf
# OAuth2 token, see https://github.com/hadley/httr/releases/tag/v0.3
.httr-oauth
# knitr and R markdown default cache directories
*_cache/
/cache/
# Temporary files created by R markdown
*.utf8.md
*.knit.md
# R Environment Variables
.Renviron
/.quarto/
_site
It is the directory of posts; each post is contained within its own folder, which generates your canonical URL for a given post. Inside that, you have your .qmd files. E.g. this blog post.

Quarto Setup
Quarto renders your website projects via your QMD documents. You can easily setup Quarto by following the docs here to get started and refer to this sites repo for further guidance.
Conclusion
In Part 2, I will show you how you can install, Build and render any quarto document on Github using workflows and actions.